Creating Data-Driven Windows 8 Apps from Microsoft’s Grid Template using REST APIs for Designers
By Don Burnett Microsoft Blend MVP (2012-2013)
Part One: Getting Started with Live Data In your App from and existing REST style Web Service…
One of the things that has been difficult with Windows 8 Apps for designers is getting at data to model it and use it in an App. With Silverlight and WPF Microsoft’s Blend has provided us with a bunch of really great tools to help us model data in an app and done the heavy lifting to make it easy to use that data directly when designing the user experience. Unfortunately when Blend was refocused to be a part of the Visual Studio family of products, the same care was not given to make data available to the “app designer” as part of a Windows Store App.
We can still work with Data but a lot of the heavy lifting has to be done by ourselves. Many apps today bring in data from an outside source, and really just consume data from some other source out there. This article will walk through the process from the designer perspective about getting data into an “app”. In this article we will walk through the process of replacing the data model in one of Microsoft’s sample GRID templates with Data from a REST data source.
In the past in as a WPF, Silverlight, or Windows Phone app designer we could just do the following steps in Blend to model our data.
- From The Data Tab in Blend: select Import Sample Data from XML

- Add the URL to our REST data API query.

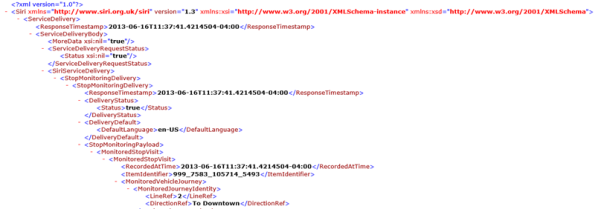
In this case I am going to look at some transit data in European SIRI format from a REST api. I just name my data source and in the XML file path I just place the URL to the data source query..
http://api.SIRIDATA.org/rest/stopmonitoring/?monitoringref=2903
If we looked at this data by pasting the URL in a WEB browser the results returned would look like this (an XML document)
- After doing this Blend creates a schema and gives me a look at the fields and I can drag and drop live data onto my design surface from this panel. The image below shows us that panel with the schema for the data source along with data types that can be adjusted based on the types of data.

This certainly made designing from data and consuming data from an API easier. You could then just drag and drop anything in that panel to data bind live data right into your interface. In fact it was pure heaven for designers because we could see changes in real-time. With Windows 8 much of this has changed for Windows Store apps. Designers no longer have this power in Blend for Windows Apps due to a number of refactoring’s of the .NET framework (aka WinRT) to support as the framework was optimized for more asynchronous delivery models and targeting different devices out there, including ARM tablets and others. However ALL is *NOT* lost and hopefully we will be able to step through this new process for you.
So how can we address this in Windows 8 as a Windows Store App? There are just a few more steps necessary. Let’s start by using one of the Grid Templates. Normally I would do this in Blend first, but in this release with the new manifests and settings I am going to do this part in Visual Studio and create a GRID template app called TransitApp.. I will assume you have already created this for this walk-thru..

Our process will include:
- Create a portable class library so that we can build assemblies that work on all Microsoft platforms, thus reducing the amount of work required to move the data layer between potential platforms that we may wish to create versions of our app for.
|
Platform |
|
.NET for Windows Store apps |
|
.NET Framework 4.0 through 4.5 |
|
Silverlight 4 and 5 |
|
Windows Phone 7.0 through 8.0 |
|
Windows Azure |
|
X-Box |
- Make Calls to a REST Service with System.Net.Http.HttpClient
- Replace the sample data source and make Asynchronous Calls to it
- Add items to our master-detail Windows Store Grid Template
Step One: Creating the Portable Class Library for our Data Layer
In the past, to share code between a Web service and a WPF application, we might create a Class Library project. To do this with Windows Store apps we must create a portable class library. This will allow us to build assemblies that work across the spectrum of Windows projects and share entities between a REST service and the Windows Store app (.NET for Windows Store apps) without code duplication on either client or server platforms. At the time of this writing, we are required to use Visual Studio 2012. So let’s walk through this process now. This assumes you have already created your own Windows Store App from the Grid Template.
In a VS 2012 Windows Store App Solution (XAML)
- Select File.. Add ..New Project…
- Select Templates ..Visual C# in the left pane.Select Portable Class Library.
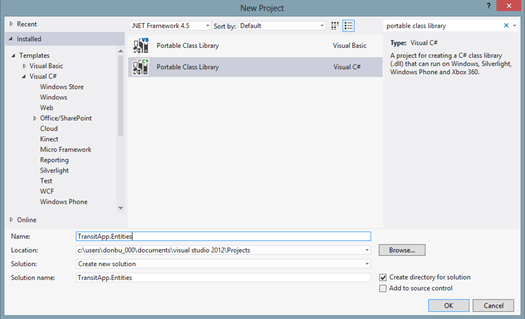
- Enter your desired name for the library in the Name textbox. I’ll use TransitApp.Entities because both my app and a REST service will share the entities defined in this portable class library.
-
Click OK.. When the Add Portable Class Library dialog box appears select only the following target frameworks:
- .NET Framework 4.5
- .NET for Windows Store apps

- .NET Framework 4.5
- Visual Studio will add the new TransitApp.Entities Portable Class Library to the solution.
- To verify things are correct, go to and open References, there will be a reference to .NET Portable Subset.
- Verify that the portable class library includes an initial class, Class1 which we will delete since it is auto-generated.
- Delete Class1
- Add a new interface, IEntity:
namespace TransitApp.Entities
{
public interface IEntity
{
string Id { get; set; }
}
}
-
Add a new class, Entity, that implements the previously created IEntity interface:
{
public class Entity : IEntity
{
public string Id { get; set; }
}
}
- Add a new class, Item, that inherits from Entity:
namespace TransitApp.Entities
{
public class Item : Entity
{
public string Title { get; set; }
public string Subtitle { get; set; }
public string Description { get; set; }
public string Content { get; set; }
public string MainPage { get; set; }
}
}
- Add a new class, Group, that inherits from Entity and groups items:
namespace TransitApp.Entities
{
using System.Collections.Generic;
public class Group : Entity
{
public string Title { get; set; }
public string Subtitle { get; set; }
public string Description { get; set; }
public string MainPage { get; set; }
public IEnumerable<Item> Items { get; set; }
}
}
- That’s all we have to do and we are ready to go with our new portable class library
- Next Go back to the TransitApp project/solution that generates our Windows Store app
- Right click on References in Solution Explorer
- Select Add Reference…
- Inside the Reference Manager, Click on Solution..Projects in the left pane, check TransitApp.Entities and click OK. This allows the Windows Store app to use all of the entities defined in our portable class library.
Step Two: Calling our REST Service with System.Net.Http.HttpClient
Next we will consume our REST service in our Grid Template based transit app by using the new asynchronous methods provided by the new System.Net.Http.HttpClient.
Go to the TransitApp project/solution
Add a new Services folder.
Add a new interface, IGroupService, within the Services folder. The following is the code for IGroupService:
namespace TransitApp.Services
{
using System.Collections.Generic;
using System.Threading.Tasks;
//// TransitApp.Entities (Portable Class Library)
using Entities;
public interface IGroupService
{
Task<IEnumerable<Group>> GetAll();
}
}
Create a subfolder named Implementation within the Services folder.
Add a new class, GroupService, within Services\Implementation.
Implement the previously created interface:
namespace TransitApp.Services.Implementation
{
using System;
using System.Collections.Generic;
using System.Net.Http;
using System.Net.Http.Headers;
using System.Threading.Tasks;
using System.Runtime.Serialization;
using System.Runtime.Serialization.Json;
//// TransitApp.Entities (Portable Class Library)
using Entities;
public class GroupService : IGroupService
{
private const string RestServiceUrl = “http://localhost:46037/api/”;
public async Task<IEnumerable<Group>> GetAll()
{
var client = new HttpClient
{
BaseAddress = new Uri(RestServiceUrl)
};
//// Add and support a header for JSON
client.DefaultRequestHeaders.Accept.Add(new MediaTypeWithQualityHeaderValue(“application/json”));
//// Retrieve groups and items
var response = await client.GetAsync(“groups”);
//// Exception throw if problems
response.EnsureSuccessStatusCode();
//// In case you need date and time properties
const string dateTimeFormat = “yyyy-MM-ddTHH:mm:ss.fffffffZ”;
var jsonSerializerSettings = new DataContractJsonSerializerSettings
{
DateTimeFormat = new DateTimeFormat(dateTimeFormat)
};
var jsonSerializer = new DataContractJsonSerializer(
typeof(Group[]),
jsonSerializerSettings);
var stream = await response.Content.ReadAsStreamAsync();
return (Group[]) jsonSerializer.ReadObject(stream);
}
}
}
The GroupService class has a GetAll method that uses the async modifier to return a Task<IEnumerable<Group>>. This method is called with the await keyword. You will be able to retrieve an IEnumerable<Group> without having to worry about a Task wrapper.
The GetAll method does the following:
Creates a new instance of the System.Net.Http.HttpClient class and sets its base address to our REST service URL.
var client = new HttpClient
{
BaseAddress = new Uri(RestServiceUrl)
};
Adds and accepts a header for JSON for the HttpClient instance.
client.DefaultRequestHeaders.Accept.Add(new MediaTypeWithQualityHeaderValue(“application/json”));
Make the REST call to GET api/groups with an asynchronous execution by using the HttpClient.GetAsync method. The method returns a Task<HttpResponseMessage> that the await keyword develops into an HttpResponseMessage.
var response = await client.GetAsync(“groups”);
Call the EnsureSuccessStatusCode for the HttpResponseMessage instance. This method throws an exception if something goes wrong.
response.EnsureSuccessStatusCode();
Creates a new instance of DataContractJsonSerializerSettings and sets a value for the DateTimeFormat property. This isn’t all there is to deserializing JSON with REST calls in Windows Store apps but it will get you started.
const string dateTimeFormat = “yyyy-MM-ddTHH:mm:ss.fffffffZ”;
var jsonSerializerSettings = new DataContractJsonSerializerSettings
{
DateTimeFormat = new DateTimeFormat(dateTimeFormat)
};
Create a new DataContractJsonSerializer instance specifiying and array of Group as a type and the previously explained settings.
var jsonSerializer = new DataContractJsonSerializer( typeof(Group[]), jsonSerializerSettings);
Call the ReadAsStreamAsync method for the Content property of the response that is an instance of HttpContent. The method returns Task<System.IO.Stream>. The call is made with an asynchronous execution by using the await keyword that creates the response into a System.IO.Stream instance.
var stream = await response.Content.ReadAsStreamAsync();
The code returns the results of the call to the ReadObject for the DataContractJSonSerializer instance that receives the previously read System.IO.Stream as a parameter. The code returns an array of Group (Group[]).
return (Group[]) jsonSerializer.ReadObject(stream);
Note: It is necessary to make sure that the App manifest provides outbond access to the Internet to consume the REST service with HttpClient.
In the TransitApp Visual Studio project/solution:
Double click on Package.appxmanifest and then select the Capabilities page, and make sure Internet (Client) is checked.
Step Three: Replacing the sample data source included in our Grid app template
Next we are go to replace the sample data source included in the Grid app template with the results of calling our previously created GetAll method to retrieve all the groups and their items from the REST service.
Process:
Remove all the code in the SampleDataSource constructor from the TransitApp project Template. We absolutely have to do this because the constructor was adding the sample groups and items.
Add a new static asynchronous method to the SampleDataSource class (RefreshDataSource):
public static async Task RefreshDataSource()
{
var groupService = new GroupService();
var allGroups = await groupService.GetAll();
foreach (var group in allGroups)
{
var sampleDataGroup = new SampleDataGroup(
group.Id,
group.Title,
group.Subtitle,
“Assets/LightGray.png”,
group.Description);
_sampleDataSource.AllGroups.Add(sampleDataGroup);
if (group.Items != null)
{
foreach (var item in group.Items)
{
sampleDataGroup.Items.Add(new SampleDataItem(
item.Id,
item.Title,
item.Subtitle,
“Assets/DarkGray.png”,
item.Description,
item.Content,
sampleDataGroup));
}
}
}
}
Go to App class (App.xaml.cs) and change the code for the OnLaunched event handler so that it calls the previously created SampleDataSource.RefreshDataSource with an asynchronous execution when the app’s previous state is ApplicationExecutionState.NotRunning.
protected override async void OnLaunched(LaunchActivatedEventArgs args)
{
Frame rootFrame = Window.Current.Content as Frame;
// Don’t initialization if content exists,
// Make sure window is active
if (rootFrame == null)
{
// Create a Frame to act as the navigation context, and navigate to first page
rootFrame = new Frame();
//Associate the frame with a SuspensionManager key
SuspensionManager.RegisterFrame(rootFrame, “AppFrame”);
if (args.PreviousExecutionState == ApplicationExecutionState.Terminated)
{
// Restore the saved session state when appropriate
try
{
await SuspensionManager.RestoreAsync();
}
catch (SuspensionManagerException)
{
//Something went wrong restoring state.
//
}
}
else if (args.PreviousExecutionState == ApplicationExecutionState.NotRunning)
{
//// Retrieve all the groups by making a call to the REST service
try
{
await Data.SampleDataSource.RefreshDataSource();
}
catch (Exception ex)
{
////Something went wrong write your code here…
}
}
// Place the frame in the current Window
Window.Current.Content = rootFrame;
}
if (rootFrame.Content == null)
{
// When the navigation stack isn’t restored navigate to the first page,
// configure the new page by passing information as a navigation
// parameter
if (!rootFrame.Navigate(typeof(GroupedItemsPage), “AllGroups”))
{
throw new Exception(“Failed to create initial page”);
}
}
// Ensure the current window is active
Window.Current.Activate();
}
To Be Continued..
Moving from Expression Web to Visual Studio 2012 for client-side HTML 5 Web Design by Don Burnett
A lot has happened this year in the world of Microsoft. Expression Studio has came to it’s end of life. This meant that Expression Web is now a community supported product.. This notice showed up on the Microsoft.com/Expression Website:
“The web is now about applications as well as traditional web sites, and this requires a new set of tools. Microsoft is committed to offering a unified approach to focus on web design and development features in Microsoft Visual Studio 2012.
As part of this consolidation, Microsoft Visual Studio 2012 provides the leading web development tool, which enables you to design, develop, and maintain websites and web applications. Visual Studio 2012 makes it easy to build CSS-based websites from the ground up with new CSS layouts, HTML5 support and full featured capabilities for working with and debugging JavaScript. Learn more about Visual Studio Express 2012 for Web and WebMatrix 2.
Expression Web is now available as a free download from the Microsoft Download Center, and no new versions will be developed. Customers who previously purchased Expression Web will receive support through the established support lifecycle. Expression SuperPreview Remote Beta will continue running as a service through June 30, 2013.”
Download Expression Web 4 SP2, Free Version
So many Expression Community members were really dismayed about this as they really love using Web for their website design projects. Many thought that Microsoft was abandoning client-side web development. Well the good news is that really is the case, Microsoft is just moving to support web apps over websites.
Pure HTML Template for Visual Studio
Pure HTML is a basic Visual Studio project template for front-end web development using only HTML5, CSS3, and JavaScript that can be downloaded on CodePlex. Using this template, gives you a purely client-oriented web site ready for you to extend with just a few clicks.
The template works with the Professional, Premium, Ultimate, and Express for Web editions of Visual Studio 2012. You can get Visual Studio 2012 Express for Web for free too.
.
The template is a installed as a visual studio extension. After you installed it you can create a new website
If you use VB:
- File > New > Project > Visual Basic > Pure HTML Web Site
- File > New > Web Site > Visual Basic > Pure HTML Web Site
If you use C#:
- File > New > Project > Visual C# > Pure HTML Web Site
- File > New > Web Site > Visual C# > Pure HTML Web Site
Expression Web Features versus Visual Studio 2012
While not quite the same, the user interface between the two products have a lot in common..


Feature comparisons: Publishing
Copy Website (FTP and site connectivity in Visual Studio 2012

Expression Web

Toolbox Comparison
| Expression Web Toolbox | Visual Studio 2012 |
 |
 |
CSS Comparison Features (not a direct side-by-side comparison)
| Expression Web | Visual Studio 2012 | |
 |
 |
 |
Code Editor Comparison Expression Web Versus Visual Studio 2012 (with Web Essentials Installed)
 |
 |
While they look a lot the same the Visual Studio IDE is quite enhanced and can be enhanced further with additions including add-ons from companies like Telerik.com. You will find yourself right at home in Visual Studio 2012 with a passel of new features added to it.
Microsoft Web Essentials
Another useful add-on is Microsoft’s Web Essentials which you can download here..
Quoting the link:
”
TypeScript
Full support for TypeScript preview and compilation. Remember to install the official plug-in for Visual Studio to take full advantage of TypeScript http://www.typescriptlang.org/#Download

When a TypeScript file (.ts) is saved in Visual Studio, Web Essentials will compile it automatically and generate a preview.
TypeScript regions
Some people hate them, other people loves them. This is a feature that was in the original Web Essentials 2010 an by popular request now made it in the 2012 version.

Source Maps
You can produce Source Map (.js.maps) files automatically by enabling it in Tools -> Options.
Compiler settings
You can set all the compiler settings from Tools -> Options
Minification
When a TypeScript file is compiled, it can now also be minified to produce a much smaller JavaScript file.
Stylesheets
Option dialog
The most important features in Web Essentials can be turned on/off.

From version 1.9, options can be applied either globally or to individual solutions.
Vendor specific property generation
A lot of the new CSS 3 properties only work cross-browser if vendor specific properties are added. These include -moz, -webkit, -ms and -o.

The result is the insertion of the missing vendor specific properties in the right order.

If one or more of the vendor specific properties are already present, then only the missing ones are added.
Add missing standard properties
Invoke the Smart Tag to automatically insert any missing standard properties.

Keep vendor specific property values in sync while typing
Display browser support for properties and selectors
Just hover over any property name, value, pseudo or @-directive to get the relevant browser support matrix.

Modernizr support
Modernizr class names will now be bolded in the CSS editor, but more importantly, they will also be respected by the automatic hierarchical indentation feature of VS2012.

Intellisense for !important
By popular demand, here you go.

Always up-to-date with W3C and browsers
Web Essentials will automatically download the latest CSS schema files used to drive Intellisense and validation. It happens in the background automatically.
Intellinsense for “Add region…”
Regions are supported in the VS2012 CSS editor, but now it’s even easier to add them.

Choosing Add region… result in this snippet being inserted.

Intellisense for custom fonts

Click to open larger image
Intellisense for handling iOS scrollbars
VS2012 supports the different pseudo elements for customizing the iOS scrollbars. It can, however, be a little difficult to work with unless you know how to chain the pseudos correctly. That’s no longer a problem.

Intellisense for CSS 3 animation names

Inline URL picker for the url() function
Just start typing and the file system shows up in Intellisense.

Warning list guides for handling best practices
Warnings for browser compatibility issues
Is your stylesheet browser compliant? Let Web Essentials tell you.

More precise error messages
Removes warnings for using the \9 CSS hack
Document-wide remove duplicate properties

Intellisense for CSS gradients (all vendor specifics included)
Gradients are really difficult to write, so now examples are automatically inserted for all the different types of gradients, including the various vendor specific ones.
Option to hide unsupported CSS properties
Some of the CSS properties, such as the CSS 3 FlexBox Module are not supported by any browser yet. Now you can turn all unsupported properties and pseudos off.
CSS specificity tooltip
In case you’ve been wondering why certain styles are never applied in the browser, you can now see the specificity for each individual selector by hovering the mouse over them.
Option to hide “inherit” and “initial” global property values
Sometimes it can feel like these two properties are too noisy in Intellisense. Though they are completely valid, you might just want to hide them.
Easily darken and lighten color values
Place the cursor in a hex color value and hit SHIFT+CTRL+ARROW UP/DOWN to darken or lighten the color.
Move properties up and down
Place the cursor in a property and hit SHIFT+CTRL+ARROW UP/DOWN
F1 help opens the relevant specification
Uses http://realworldvalidator.com to provide more accurate information than the W3C specifications.
Supports team-wide color schemes
More info on working with custom color palettes coming…
Up- and down arrows control numeric values
When the cursor is in or next to a numeric value such as 5px, .6em, 15% or just 23, you can use CTRL+SHIFT+UP to increase the number and CTRL+SHIFT+DOWN to decrease it. The feature is known from FireBug.
This works for CSS, SaSS and LESS files.
CoffeeScript and LESS preview window
Both LESS and CoffeeScript comes with a preview window located at the right side of the editor. It shows the compiled output every time you save the document.

If any LESS file name is prefixed with an underscore (_file.less), then it won’t generate a .css file automatically.
Embed url() references as base64 strings
This will take the referenced image and base64 encode it directly into your stylesheet. You have then eliminated an HTTP requst.

If the base64 string becomes to long, you can easily collapse it.
![]()
Remember to optimize your image files before embeding them. Use the Image Optimizer extension to make it effortless.
Color swatches
All color types are supported, including the new CSS 3 formats.

Minification
Right-click any CSS file in Solution Explorer to produce a *.min.css file. Whenever the source .css file is changed, the .min.css file is updated accordingly.
You can also minify the selected text in the editor by right-clicking the selection.
Font preview on mouse hover

Image preview on mouse hover

Sort properties
A Smart Tag on every selector enables you to easily sort all the properties within the rule.

As of version 1.9, the sorting is no longer alphabetically but instea uses the order specified by the CssComb project.
Drag and drop support for imaged and fonts
Drag and image onto the editor from either Solution Explorer or your desktop and a background-image property will be inserted with the relative path to the image file.
Do the same with a font file, but in this case all font files with the same name but different extensions (.ttf, .eot, .woff, .otf) will be added to the same @font-face rule.
Convert easily between hex, rgb and named color values

Adds SmartTags to selectors for targeting specific IE versions
Specific hacks can be used to target specific versions of IE on a selector level. These are all valid according to the W3C.

Selector Intellisense for HTML elements, classes and IDs


CSS/LESS document outline
Get a sneak-peek inside any CSS or LESS file directly from Solution Explorer.

JavaScript
JSHint for JavaScript
JSHint is a really good way of making sure your JavaScript follows certain coding guidelines and best practices. The default settings are very relaxed, but you can turn on more rules through the new options dialog.
The error window updates as you type, so you don’t have to right-click the .js file to kick off JSHint. It happens as you write.
Each indiviual JavaScript file can override the global settings by using the official JSHint comment format descripted in the JSHint documentation.
In version 1.8 you can also enable JSHint to run on build.
JavaScript regions
Some people hate them, other people loves them. This is a feature that was in the original Web Essentials 2010 an by popular request now made it in the 2012 version.
ZenCoding for HTML
Watch this short demo video and read more about the ZenCoding syntax.
Lorem Ipsum generator
As part of ZenCoding, you can now generate Lorem Ipsum code directly in the HTML editor. Simply type “lorem” and hit TAB and a 30 word Lorem Ipsum text is inserted. Type “lorem10” and a 10 word Lorem Ipsum text is inserted.
This can be used in conjuction with ZenCoding like so: ul>li*5>lorem3
Markdown
See the compiled markdown in a preview window inside Visual Studio.”
SignalR and One ASP.NET with Scott Hanselman
SignalR allows us real-time communication between web pages and the server in ASP.NET. Check out this video uploaded to YouTube by a poster, that goes in-depth on this great new performance enhancement to ASP.NET..
How I Spent My Summit: The Microsoft MVP Summit 2013
By Don Burnett-Microsoft Expression Blend MVP 2012-2013
 The Microsoft MVP Summit is always a fun event with exciting people and fun happenings. Much of the session content is under NDA so I cannot speak to most of it more than to say that I had a great time conversing with some of the brightest and best thought leaders out there. I have been totally blessed to have this experience for five years. I wanted to thank Microsoft for the great time and allowing us to have this experience.
 This summit was a great opportunity to network about issues affecting the user community and explore solutions that are possible and very community grounded. I was very excited by this summit because there were many people interested in working with each other and a sense of new togetherness that there are again exciting times ahead for technology engagement in an open inclusive for all methodology. I saw a lot of change from within especially from Microsoft that has completely changed my over all outlook and direction for the future.
Prolific Technology Releases Ahead
There were a few releases out there this week that show us some exciting things that are ahead. Here are a few of the public announcements this week that were exciting that gives us a glimpse into the direction for the coming year..
Blend is Back
Quoted from the Blend Insider: http://blendinsider.com/technical/announcing-visual-studio-2012-update-2-ctp-2013-01-30/
“The CTP of Visual Studio 2012 Update 2, as it bring forwards a number of improvements for the XAML developer. The following are some of the key improvements you will find in this release:
WPF, Silverlight and SketchFlow support in Blend
Blend for Visual Studio now support WPF, Silverlight and SketchFlow projects in the same version of Blend (support for these was previously available only as a standalone Preview release of Blend). With this CTP release, Blend now supports developing Windows Store, Windows Phone, WPF and Silverlight apps without needing to have multiple versions of Blend on the same machine. The table below highlights the various platforms that are now supported in Blend for Visual Studio 2012:


Illustrator and Photoshop import support for Windows Store XAML apps
Blend now allows you to import Adobe Illustrator and Photoshop files into Windows Store XAML apps, using the same workflows that you have been familiar with in WPF, Silverlight and Windows Phone. In addition, we have also enabled copying and pasting graphics from Illustrator directly into your XAML design surface.
Performance and Reliability
We have been actively working on improving the performance and reliability of using the XAML design surfaces in Visual Studio and Blend, as well as the XAML editor in VS. While our work is not yet complete, we have addressed a significant amount of feedback that we received in this release – particularly in areas where the XAML designer would take a long time to load for large projects. The following is a quick sampling of areas where you might see improvements in this release.

In addition to this, we also fixed approximately 30% of all issues that were submitted by you via Microsoft Connect. We continue to make progress on addressing more issues as fast as we can. “
ASP.NET and Web Tools 2012.2 Update

From John Galloway’s Blog: http://weblogs.asp.net/jgalloway/archive/2013/02/18/announcing-the-asp-net-and-web-tools-2012-2-release.aspx
From Scott Gu’s Blog: http://weblogs.asp.net/scottgu/archive/2013/02/18/announcing-release-of-asp-net-and-web-tools-2012-2-update.aspx
“
Visual Studio Web Tooling Enhancements
Video: http://media.ch9.ms/ch9/9496/92341e4a-2951-4420-bfb1-a0903d9b9496/ASPNETandWebTools2012dot2.wmv
With today’s release, all of the ASP.NET templates have updated versions of jQuery, jQuery UI, jQuery Validation, Modernizr, Knockout, and other open source NuGet packages. Note: your existing projects will continue to use the older packages unless you update them.
Web site projects now have the same publish experience as web application projects, including new support for publishing to Windows Azure Web Sites. You can selectively publish files, update local to remote files or vice versa, and see the differences between local and remote files.
Visual Studio 2012 Page Inspector enhancements include JavaScript selection mapping and CSS live updates as you type. The JavaScript selection mapping enables Page Inspector to map items that were dynamically added to the page back to the corresponding JavaScript code. For more information, read CSS Auto-Sync and JavaScript Selection Mapping in Page Inspector.
The Visual Studio 2012 editor has several improvements. With today’s update VS now supports syntax highlighting for:
- CoffeeScript
- Mustache
- Handlebars
- JsRender
The HTML editor provides Intellisense for Knockout bindings. There is even first-class support for editing LESS files, complete with syntax highlighting, Intellisense, and validation. The editor also supports pasting JSON as a .NET class.
Copy any JSON data into the clipboard, use a Paste Special command to paste it into a C# or VB.NET code file, and Visual Studio will automatically generate .NET classes inferred from the JSON.
Mobile Emulator support adds extensibility hooks so that third-party emulators can be installed as a VSIX. The installed emulators will show up in the F5 dropdown, so that developers can preview their websites on a variety of mobile devices. Read more about this feature in Scott Hanselman’s blog entry on the new BrowserStack integration with Visual Studio.
ASP.NET Web API Enhancements
With today’s release, ASP.NET Web API now provides support for OData endpoints that support both ATOM and JSON-light formats. With OData you get support for rich query semantics, paging, $metadata, CRUD operations, and custom actions over any data source. Read more about ASP.NET Web API OData support at http://www.asp.net/web-api/overview/odata-support-in-aspnet-web-api.
New built-in tracing functionality now lets you easily diagnose problems with Web API whether you’re running in Visual Studio or on Windows Azure. Tracing output from Web API is automatically written to the Visual Studio output window, IntelliTrace, and any other trace listener that you would like, including Windows Azure Diagnostics. The output shows the full Web API pipeline for all requests, including any exceptions or errors that occur, what controller and action were selected, model binding, the format that was negotiated, and the response.
Updated Web API projects now contain a link to an automatically generated help page that shows how to call your web API. The help page shows all of your API endpoints, the HTTP verbs they support, parameters, and sample request and response messages. You can customize the help page as you like, including adding documentation and test client functionality. This makes it really easy to create documentation pages for developers calling your services.

ASP.NET SignalR
ASP.NET SignalR is a new library for ASP.NET developers that simplifies the process of adding real-time web functionality to your applications. Real-time web functionality is the ability to have server-side code push content to connected clients instantly as it becomes available.
You may have heard of the HTML5 WebSocket API that enables efficient bidirectional communication between the browser and server. SignalR uses Websockets when it is supported by the browser and the server, and gracefully falls back to other techniques and technologies when it is not (best of all your application code can stay the same regardless of which is being used).
SignalR provides a simple API for creating server-to-client remote procedure calls (RPC) that call JavaScript functions in client browsers from server-side .NET code. SignalR also includes API for connection management (for instance, connect and disconnect events), grouping connections, and authorization.
Included in today’s release is Visual Studio 2012 template support for creating SignalR projects as well as adding SignalR support to existing Web Forms and MVC applications:

Read more about SignalR at http://www.asp.net/signalr.
ASP.NET Web Forms Enhancements
ASP.NET Friendly URLs enable you to remove the .aspx extension from your Web Forms pages, making your sites’ URLs look cleaner. You can also pass parameters to pages as segments of the URL. For example, instead of ProductDetails.aspx?id=5 you can have ProductsDetails/5. With Friendly URLs you can also easily support mobile devices by creating mobile versions of pages:
- YourPage.aspx – This is the page that will be rendered by default on a browser.
- YourPage.Mobile.aspx – This is the version of the page that will be rendered by default on a mobile browser.
- YourPage.Device.aspx – You can write your own code to map a user-agent string to a specific device name. For example, you could have pages for Windows Phone, iPhone, and Android devices.
ASP.NET MVC Enhancements
A new Facebook Application template makes writing Facebook Canvas applications using ASP.NET MVC really easy. In a few simple steps, you can create a Facebook application that gets data from a logged in user and integrates with their friends. The template includes a new library to take care of all the plumbing involved in building a Facebook app, including authentication, permissions, accessing Facebook data and more. This lets you focus on building the business logic in your app. The Facebook apps you can build with this new template are hosted on the web and displayed inside the Facebook chrome via an iframe.

Single Page Applications
A new Single Page Application template for ASP.NET MVC is also now included and allows developers to build interactive client-side web apps using HTML 5, CSS 3, and the popular Knockout and jQuery JavaScript libraries – all on on top of ASP.NET Web API.
The default template creates a “todo” list application that demonstrates common practices for building a JavaScript HTML5 application that uses a RESTful server API. You can read more at http://www.asp.net/single-page-application.
If you don’t want to use the new Knockout template there are 4 new community-created templates. These templates were built using the improved Custom MVC Template support:
- BreezeJS template that uses BreezeJS and Knockout for data binding and templating
- Ember template uses the latest version of Ember and Handlebars
- DurandalJS template is built using the new MVVM library DurandalJS as well as Knockout
- Hot Towel uses BreezeJS, DurandalJS, Knockout, require.js and Bootstrap
You’ll see even more templates in the months ahead.
Windows Azure Authentication Enhancements
A new pre-release of Windows Azure Authentication is also now available for MVC, Web Pages, and Web Forms. This feature enables your application to authenticate Office 365 users from your organization, corporate accounts synced from your on-premise Active Directory, or users created in your own custom Windows Azure Active Directory domain. For more information, see the Windows Azure Authentication tutorial. “
What does all of this bring to the Microsoft Web Platform ?
All of this integration and new functionality is a total productivity bombshell for designers, developers and anyone looking for streamlined development solutions. Did I mention that the ASP.NET Web Platform has went open source under the ONE ASP.NET banner ? It’s an exciting time for their platform as it moves forward with real-time updating via SignalR, Facebook at the Template level, and things like Classes from a JSON data paste..
Towards a more connected world and an internet of things.. Go! Go! Gadgeteer..
Let’s Build Something..

Does anyone remember Microsoft’s SPOT watches A.K.A.
Smart Personal Object Technology) ?
Well that was how Microsoft’s .NET Micro Framework and that platform came to life, and is now exploding in the do-it yourself electronics sector is exploding.. From Robotics, to Weather, to do-it yourself medical monitoring devices, this is the platform to do it with and the best thing about it is the fact that it is Free and Open Source and you probably have it already in devices (including your cable set top box) and don’t even know it..
.NET Micro Framework is an open source platform that expands the power and versatility of .NET to the world of small embedded applications. Desktop programmers can harness their existing .NET knowledge base to bring complex embedded concepts to market on time (and under budget). Embedded Developers can tap into the massive productivity gains that have been seen on the Desktop.
Choosing Hardware
Browse the Product Showcase to see what’s available. Choose from a variety of starter kits or build your own assortment. At a minimum, you’ll need:
- A mainboard, such as GHI Electronics Fez Spider or Fez Hydra, or the Sytech NANO
- A red USB module, to connect to your computer and power the mainboard.

- Modules to plug into your mainboard: sensors, displays, storage, networking, input and more! Starter kits like the Fez Spider Starter Kit and the Sytech NANO Basic Kit give you lots of modules to work with.

Don’t forget to check out the very cool array of Gadgeteer-compatible Seed Studio modules, including accelerometer, GPS, gyro, moisture sensor and more!

Up to now, embedded devices have been quite effectively created using mostly C and C++, why do we need C#? Certainly there will remain applications for which C and C++ are the right technology to use but there are two reasons to consider using a managed environment for these devices.
The first is the efficiency of creating and maintaining devices in managed code. Desktop developers who have made the move to managed code are typically converted by the productivity increases that they experience. With the increase in 32 bit processors and the need to support higher level functionality like a TCP/IP stacks, an environment like NETMF can make development much less expensive and risky.
This is related to the other reason for .NET on small devices. More and more the devices that we are making are not isolated implementations but parts of much larger solutions that stretch to services and web sites and the cloud. With .NET, you have a programming model and tool chain that spans that entire solution space. There is less need to hire different staff and support different tools and operating systems for the various parts of the solutions.
Summit Project Weather Station in the Cloud

At the Summit I put together a weather station, just about the only NON-NDA activity that I can talk about and boy it was fun.. After assembling the hardware and connecting it to USB for power and debugging I was excited to see my first foray into electronics projects was a success..


Creating a Sharing Contract for Windows 8 & RT Apps
By Don Burnett
Expression Blend MVP
The coolest new feature that I really love about Windows 8 and Windows RT is that they now have a new universal sharing interface. If you swipe inward on a touch screen from the right side of the screen (or mouse to the top right pixel) you will get presented with a new menu of options called “Charms” one of these is a sharing button. If you have a new surface or brand new Windows 8 keyboard from Microsoft you will notice this is a button in the new layout as well.

When you select the charms button a new side panel will appear with different apps that will let you share to and from. If you are trying to share from a desktop app I recommend an app on the Windows store called “Clipboard” which will let you take stuff easily through the new sharing interface should your app not be clipboard enabled with the desktop.

Implementing a Sharing Contract in Our App
The first thing we will need to do is to wire up the DataTransferManager into the MainPage of our app code..
Using Windows.ApplicationModel.DataTransfer;
Next we create an event handler for it in code
DataTransferManager manager = DataTransferManager.GetForCurrentView();
manager.DataRequested += manager_DataRequested;
Next we create some simple event handler code so when the share charm is invoked to the user the event is passed to our page..
void manager_DataRequested(DataTransferManager sender, DataRequestedEventArgs args)
{
DataRequest request = args.Request;
request.Data.Properties.Title = "Handy Dandy Share contract";
request.Data.Properties.Description = "Share some text";
request.Data.SetText("Sharing is Caring..");
}
The framework decides on the correct share client based on the format of the content that we plan to share.. The example above is text, but you could easily wrap in a share to Facebook or a share to twitter by simply adding code for it to your app..

If my app were using HTML for instance and I was sharing some HTML info that I wanted to share over mail it might look like this..
void manager_DataRequested(DataTransferManager sender, DataRequestedEventArgs args)
{
  DataRequest request = args.Request;
  request.Data.Properties.Title = string.Format("Sharing Is Caring - {0}", CurrentPortTitle);
  request.Data.Properties.Description = "Sharing this info";
  TilePort sharePort = TilesQueue.ToArray().FirstOrDefault(p => p.ID.Equals(CurrentPortID));
  string htmlMail = BuildHtml(CurrentPort);
  string htmlFormat = HtmlFormatHelper.CreateHtmlFormat(htmlMail);
  request.Data.SetHtmlFormat(htmlFormat);
}
Types of data you are allowed to share from your app..
- Plain text
- Uniform Resource Identifiers (URIs)
- HTML
- Formatted text
- Bitmaps
- Files
- Developer-defined data
The core of any sharing operation is the DataPackage object. This object contains the data the user wants to share. A DataPackage can contain a delegate. A delegate is a function that is called when the receiving app requests data. You should use a delegate any time that the data a user wants to share is resource-intensive. A delegate can help your app share data more efficiently.
The example above only is a simple text sharing contract..
To share content such as images or files, we will need to add the following namespaces as well. Here’s a list of the namespaces necessary..
- Windows.Storage. Needed for working with StorageFile and other objects.
- Windows.Storage.Pickers. Used to open the file picker so users can select images and files.
- Windows.Storage.Streams. Often used when sharing images, files, and custom-formatted data.
- Windows.Graphics.Imaging. Useful if you need to modify images before sharing them.
Sharing a hyperlink
private void RegisterForShare()
{
// create DataTransferManager object
DataTransferManager dataTransferManager = DataTransferManager.GetForCurrentView();
// create event handler
dataTransferManager.DataRequested += new TypedEventHandler<DataTransferManager, DataRequestedEventArgs>(this.ShareLinkHandler);
}
private void ShareLinkHandler(DataTransferManager sender, DataRequestedEventArgs e)
{
// Set title and Description Properties
DataRequest request = e.Request; request.Data.Properties.Title = “Share My Cool Link”; request.Data.Properties.Description = “Add a link (URI) to share.”;
// To add the link, use the SetUri method.
request.Data.SetUri(new Uri(https://blendersuxblog.wordpress.com));
}
Share an Image
Here’s an example to share an image..
private void RegisterForShare()
{
DataTransferManager dataTransferManager = DataTransferManager.GetForCurrentView();
dataTransferManager.DataRequested += new TypedEventHandler<DataTransferManager, DataRequestedEventArgs>(this.ShareImageHandler);
}
private async void ShareImageHandler(DataTransferManager sender, DataRequestedEventArgs e)
{ DataRequest request = e.Request; request.Data.Properties.Title = “Share My Graphic Image”; request.Data.Properties.Description = Image Sharing.”;
// Remember also when we start making async calls in the DataRequested event handler,
// we need to get the deferral before anything else..
DataRequestDeferral deferral = request.GetDeferral();
// Make sure we always call Complete on the deferral.
try
{
StorageFile thumbnailFile = await Package.Current.InstalledLocation.GetFileAsync(“Assets\\VNEXTLOGO.png”);
request.Data.Properties.Thumbnail = RandomAccessStreamReference.CreateFromFile(thumbnailFile);
StorageFile imageFile = await Package.Current.InstalledLocation.GetFileAsync(“Assets\\VNEXTLOGO.png”);
request.Data.SetBitmap(RandomAccessStreamReference.CreateFromFile(imageFile));
}
finally
{
deferral.Complete();
}
}
Write NATIVE C++ Code with XAML Event

The Channel 9 Event is happening live today on Channel 9.. Catch it today live right now..
(Editor’s Note: Since the event is past now All sessions will be available for on demand viewing on 5/21 or 5/22.)
http://channel9.msdn.com/Events/Windows-Camp/Developing-Windows-8-Metro-style-apps-in-Cpp
Tweet questions to #ch9live.
Whether you are a new C++ developer ready to learn about writing Metro style apps, an intermediate developer who wants to hone your code and skills, or an experienced C++ developer eager to squeeze every ounce of performance out of your Metro style app, this event is for you. We will have pragmatic advice for every developer writing Metro style apps and games with XAML and/or DirectX and C++.
Note: These Windows-specific talks will use both portable ISO C++ and Visual C++-specific compiler extensions.

The MetroPad Project: Designing and Building for Win 8
An Ode to Arktronics TextCraft
When I was a young kid in high school, I was quite the computer geek. Nastier people in high school called me a nerd. Nowadays the jocks that I know, nicknamed me “Super Techie”.. I was a very lucky kid though. My first real computer (that did more than BASIC language programming) was called the Commodore-Amiga 1000. It’s pictured below. I scanned a picture of it below from original specification sheets I still kept today.. And, yes, I am an Amiga collector today..

I loved this computer because BASIC didn’t show up when you loaded it up, you got the multi-tasking AmigaDOS though I spent many hours learning programming in Amiga Lattice C and finally SAS C, . Computers didn’t multi-task back then or really even task switch. Computers usually had 4 to 16 colors, and this one had 4096 that you could see on screen at once. It had a BIMMER (A super “blitter”) and three separate chips that ran independent of the CPU most of the time. These days we call this kind of thing a GPU..
 The first GUI word processor I got for this was called TextCraft, in those days software wasn’t sold and licensed in quite the same way as it is today and Commodore-Amiga released for the Amiga 1000 under AmigaDOS 1.0-1.3.. The first time I saw TextCraft my first thoughts were I want to reach right out and touch the buttons on the screen.
It was done by a small local company called Arktronics (later called the Disc Company) who did the first GUI based word processor called Jane for the Apple ][ and Commodore 128 8-bit computers. I was asked to come in on Saturday mornings during high school and beta test for them. It was fun and free and I got to meet company founders (back so long ago) like Bobby Kotick who later bought Activision and is now the president of Activision Blizzard.

The user interface was simple and effective and what we would consider a spartan text editor today, but as I mentioned before it looked touch friendly and inviting for touch.. Very Mac like but colorful (unlike the Macs of it’s time). And very touch friendly (even though we didn’t have a touch interface on an Amiga until a few years later (Elographics) and it looked nothing like an Apple iPad today or a Windows 8 Slate PC either..
METRO INFLUENCERS
When I saw the Windows 8 Metro interface for the first time I started doing some free association about what I thought of it as a design language. What it meant for touch and the first time I wanted to touch a computer’s screen. I got that same feeling again when I started looking at “METRO” apps on a Windows 8 Tablet.
Microsoft Word from the upcoming Office 15 version ??

I don’t need something a complicated as (in the picture above) to process text. The screen shot above is supposedly of the upcoming Microsoft Word in the upcoming Office 15. My app will be less complex, and be just touch enabled to take notes and process text. This app isn’t to create novels on like I could with the upcoming “metro” Word update in Office 15. Check out the WinSuperSite Preview by clicking on the picture above..
By the way, is this a “REAL” METRO APP ? From the pictures, it still seems to use the Windows Desktop Mode for it’s document creation (at least so far as what we have seen so far).
But heck! I want a “tablet” touch friendly interface experience that I can type right on the screen with to create simple text documents. I don’t even’ really need Rich Text Format for what I am doing just simple “type and go” type . So that was my impetus for starting to work on a “MetroPad” app for Windows 8, and to also give me a chance to to learn to create a running “metro” style application with Blend for Visual Studio and Visual Studio 11.
Giving our project the “metro” treatment
So I decided to re-imagine TextCraft as it would look had it jumped from 1985 to 2012 in a few hours..

Stay away from the feature creep
The first thing that I thought of when I decided to create a Metro app.. What were my tasks ?
- Basic text editing cut/paste/copy/undo/selection
- Styling Text: Bold, Italics, and underline
- Load or Save locally or in the cloud
- Inserting an image into our text layout
- Basic printing
Starting our project with Blend for Visual Studio
Why not just get started by opening Visual Studio and getting started coding ? Because we are designing a real METRO app ! That’s why! Ultimately you should start with wireframes and good design practice. You might want to start here..
The days of “Make it look pretty..” are gone
 If you are a programmer you are about to get mad at what I am going to say to you.. I am going to take you out of your comfort zone. Even with WPF and Silverlight there weren’t strict standards for user interface adherence. You could get away with coding everything then going back and hiring a designer to cobble something together to make your code together into something that worked but not something your users’ could live with are gone ..

If you started your application for Windows and it looks like a bad game of tic-tac-toe or the TV show “The Hollywood Squares” you really aren’t getting the point of the METRO design language in the first place.
In this instance a “Live Tile” is not a menu item or a menu button.. This is not how you select something. Do you think this would sell competitively ?
METRO APP TEMPLATES ARE DESIGN FIRST
 I have been just about crapping in my pants about how ineffectively “METRO” design principles are being conveyed at WIndows 8 bootcamps lately. Yes that means you Microsoft Developer Evangelists, I am calling you out on this..
If you get an introduction to Windows 8 with someone first opening Visual Studio and not Blend FIRST! then you are getting a really bad deal. There is no easier way for a developer to go down the wrong path without this.. The reason that Blend is not Expression Blend but Blend for Visual Studio is that Microsoft feels that Blend is such an integrated part of Visual Studio now it will come integrated into every commercial version of Visual Studio for Windows 8..
Default templates now included with both Visual Studio and Blend are now included a warning message that if you don’t include “METRO” design functionality in your interface that they will not work and will not be accepted to the “Windows Marketplace”..

ReadMe.txt:
“The Common directory contains classes and XAML styles that simplify application development. These are not merely convenient, but are required by most Visual Studio project and item templates. Removing, renaming, or otherwise modifying the content of these files may result in a project that does not build, or that will not build once additional pages are added. If variations on these classes or styles are desired it is recommended that you copy the content under a new name and modify your private copy.”
What is in the common folder that’s so important ?
Value Converters
Boolean Negation: A boolean negation converter for visibility that translates true to Visibility.Visible and false to Visibility.Collapsed
Boolean to Visibility: A value converter that translates true to false and vice versa.
Layout Aware Page Class
A common implementation of “Page” that provides several important conveniences
- Adds an application view state to visual state mapping
- GoBack and GoHome event handlersr
- A default view model
BindableBase.cs
An implementation of INotifyPropertyChanged that simplifies models. Creates a “multicast” event handler and listener for INotifyPropertyChange events.
RichTextColumns.cs
A wrapper for RichTextBlock that creates as many additional overflow columns as needed to fit the available content.
StandardStyles.xaml
Standard light and dark styles and rules for metro apps. These will be familiar to Blend designers.
Freezing your Application with Suspension Manager Code

Because Windows 8 and METRO applications now run on both ARM and Intel devices and can scale to phones, tablet, PCs and even maybe some other types of devices we haven’t thought of yet that can run on batteries, Microsoft recommends you include code to freeze and unfreeze your application temporarily. In a world where we run on extremely low power devices with batteries being able to suspend your METRO application has become extremely important..
Microsoft provides SuspensionManager.cs sample code that you can use for handling this process. I have heard more than one programmer since Windows Phone and Windows 8 suggest that the ability to “Freeze” apps and switch isn’t real multi-tasking. Well my response is this: if you have a device (other than a desktop PC) that you can switch off and switch back on at anytime and you an OS that has to fetch things at odd intervals and must stop what it’s doing then be “instantly” back on you need to be able to do this.
There are many situations where you may loose a data connection as well that the device can’t just sit there eating your battery. Under Windows Mobile battery life was terrible. It was mostly because multi-tasking was a continuous thing and the suspend resume facilities that were added weren’t used effectively by app programmers.
This also affects the user experience and user interface as well. You can’t just really terminate and restart the program and expect the user not to get annoyed when they pick up the device and were not right back where they left it.
It needs to remember what the user was doing and where it was when they left off. This works well in all cases including when the program is waiting for too long for something (including things like a data request from the internet) and is terminated by the operating system so it’s not caught in a battery eating loop.
Programmers might ask wait, suspending “apps” has to do with design. Well our program must remember what was going on before, context, state, etc. so when it resumes and reactivates the user finds themselves right back where they were when they see your app’s UI.
For more information on lifecycle events check out:
- http://msdn.microsoft.com/en-us/library/windows/apps/xaml/hh465115.aspx
- http://blogs.msdn.com/b/windowsappdev/archive/2012/04/10/managing-app-lifecycle-
so-your-apps-feel-quot-always-alive-quot.aspx
The OnLaunched Lifecycle Event
Adding an OnLaunched event handler code, lets your app can check the PreviousExecutionState on the event arguments. If it equals Terminated, restore the data you saved in the Suspending event. If it is a different value, use your app’s default data.
In our app we could even override the OnLaunched event to handle activation a basic activation from a live tile.
Here’s an example code snippet that Microsoft provides for creating an OnLaunched Handler to deal with user activation of a stock app that loops through all possible scenarios including resuming from a suspend application:

More on this later, but in our own app, the user might be editing or entering text that they haven’t saved, and if the user has suspended work and switched to another app or he has powered down his device we want to be able to fetch the text back to the exact state he was in before.
Starting in Blend for Visual Studio

As soon as I am in Blend for Visual Studio I am going to create a new project. For this project I am going to use C# and XAML just as I would have if I were doing a .NET project in the past instead of a WinRT project right now.. I could just as easily do this in JavaScript or C++ native code because Blend supports them both. In a future installment I will look at doing this app in C++. Unlike past versions of Windows the WinRT XAML controls that we will be using are the same across these different languages and have all the same capabilities, in both native and managed code, making our development cycle much easier. Here is a look at the XAML control toolbox in Microsoft Expression Blend..

Since we are doing text editing and processing in our app I was hoping to find a “rich” textbox control that handled “RTF” (rich text format) text and had methods already established for formatting text. Unfortunately since we are in the “beta” state there seems to be NO SUCH control as I have seen in previous versions of Windows to make this easier. I would really love to be able to change the typeface and control formatting text and decorations that adorn the look and style of my users’ text more precisely.
My options currently are as follows:

This forces me again to think about the user experience and which controls I am going to use.. I finally decided to use the RichEditBox because every other option seems to be one way and static one way bindings for data.
 Next, I started to create the elements I needed on-screen starting with the RichEditBox.. My layout ended up looking like this and there is still some new options needed but let’s focus on our main work area for now the RichEditBox control..

After dropping the RichEditBox control in our BlankPage.XAML main grid on the design surface of blend in the main stack panel I named the control RTBEdit and set-up properties for the control. The XAML code looked like this:
<RichEditBox x:Name=”RTBEdit” Height=”400″ VerticalAlignment=”Top” ScrollViewer.HorizontalScrollBarVisibility=”Disabled” ScrollViewer.VerticalScrollBarVisibility=”Visible” BorderBrush=”Black” Background=”White” FontSize=”26.0″/>
Our next adventure will be wiring up the RichEditBox to bring in a text file using the file picker.
I will next create the background rectangle for my RULER and create a series of buttons and create a code behind to pick and read the file into the RichEditBox for viewing and editing..
So to get started I create a series of buttons in the main Grid’s StackPanel and set the ordering so it will include a rectangle the RichEditBox and FileDetail TextBlock which will later show us the file name of the text we have currently loaded up.
 In the main Grid I will also create a horizontal StackPanel and name it Menus. Here I will add our project menu to load and save files. There will be a few other buttons for Layout, Styling text, and any Extra capabilities we might implement. Since this is a text editor that is touch friendly we will only allow one file open at a time.
So this means I will use the Project menu to Load new text and contextually save when necessary. We will automatically check to see if the text is UNSAVED and prompt the user clicking the Project Button.

Before we fill the rest of these out, let’s wire up some code to the ProjectBtn so we can pick a file to open and load the text right into the RichEditBox control.
 When we select the ProjectBtn control we notice that it is simply a control derived and inheriting the properties and capabilities of the Windows.UI.Xaml.Controls Class.. and it reacts to the ButtonBase CLICK event.
When this click event fires on our project button we will need it to access the “METRO” file picker and read in the text file into our RichEditBox for user manipulation.
 Making sure we have the ProjectBtn Clicked in the design surface, we go over to the properties panel and select the events icon that looks like the symbol for lightning.
This will switch us to the next view to define our code-behind.
 Next we will name our “Click“ event UIOpenFile_Click. When we hit enter after typing the name, Blend will next open us up in code mode away from design mode on BlankPage.XAML.cs and give us the frame for us to type in the code needed to open up our file picker in the METRO interface and select files.. Be sure to watch for duplicate names in the code.
Here in our code editor we can next enter code for when this event fires.

We next add code to pick the file and load up our RichEditBox with the text file..

So the first thing we do is create a keyword NEW instance of the FileOpenPicker() function that we will name picker.
var picker = new FileOpenPicker();
Next we define a few of the more important properties to help guide the user along..
picker.SuggestedStartLocation = PickerLocationId.DocumentsLibrary;
picker.ViewMode = PickerViewMode.List;
First should set a start location for this picker to open. We should point it to open up right inside the users own documents library.. Since we are not dealing with loading an image in this case (just opening a text file) I am going to show the picker in the file list mode instead of thumbnails.
picker.FileTypeFilter.Clear();
picker.FileTypeFilter.Add(“.txt”);
// no RTF file support yet in RichEditBox picker.FileTypeFilter.Add(“.rtf”);
picker.FileTypeFilter.Add(“.htm”);
Next I am going to set our picker to clear any file type filters that are already set and only show us files ending in .TXT and .HTM format. We could add more filters to show only the filetypes we needed. But this works fine for now.
var file = await picker.PickSingleFileAsync();
if (file == null) return;
string fileContent = await FileIO.ReadTextAsync(file);
Next, tell it to wait until the user has chosen a file and make sure there is content in it before trying to read it into memory and store it in the RichEditBox. Here is our Picker opened up ready to choose a file.

After the file is read we pass the name of the file to the TextBlock control’s text property so the user sees the name of the file we are loading.
FileDetail.Text = file.Name.ToString();
Next we call the RichEditBox’s SetText functionality to pass the file object that the Picker has created for us to pass the content into RichEditBox for editing.
this.RTBEdit.Document.SetText(Windows.UI.Text.TextSetOptions.None, fileContent.ToString());
and voila!! We can now load text right into our RichEditBox..

Ford Focus Electric SmartPhone Integration
Engadget.com has a great report on SmartPhone Integration with the Ford Focus Electric..
Check out the report at:
http://www.engadget.com/2012/04/17/ford-focus-electric-test-drive-and-myford-mobile-hands-on-video/
Add a Guest Operating System (Linux, etc.) to Windows 8
You can use the hardware virtualization built into many CPUs to run a guest operating system directly inside Windows 8.. So you can run Windows 7, Windows XP, Linux, etc. Right inside of Windows 8..


